UN/UNR/UNJ THREADS
CONTENTS
Introduction/Easy Memory Chart

A Practical Method to cut a Thread/General Notes

UN Definition
UN Example
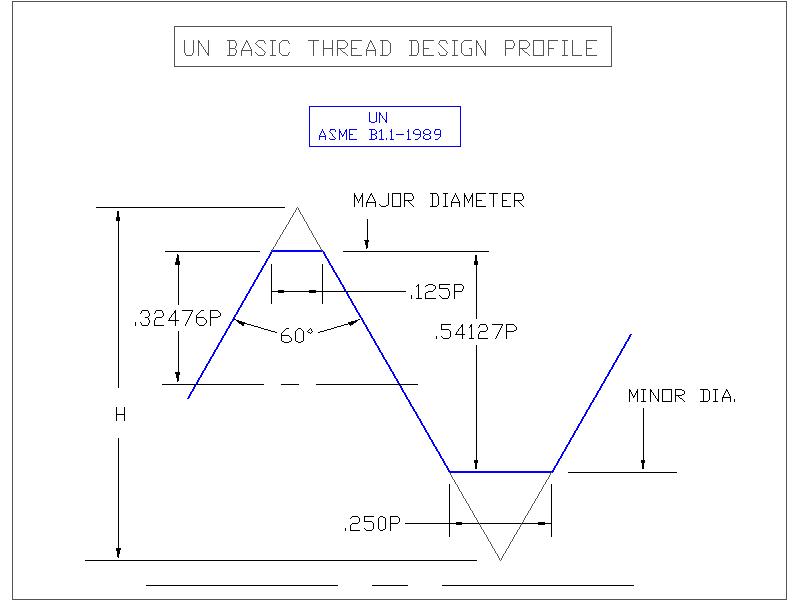
UN Basic Drwg.
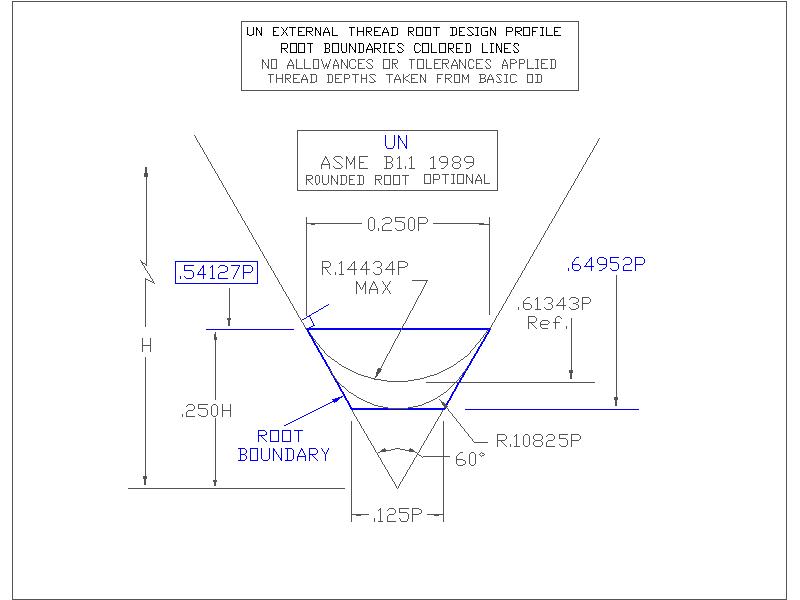
UN External Drwg.
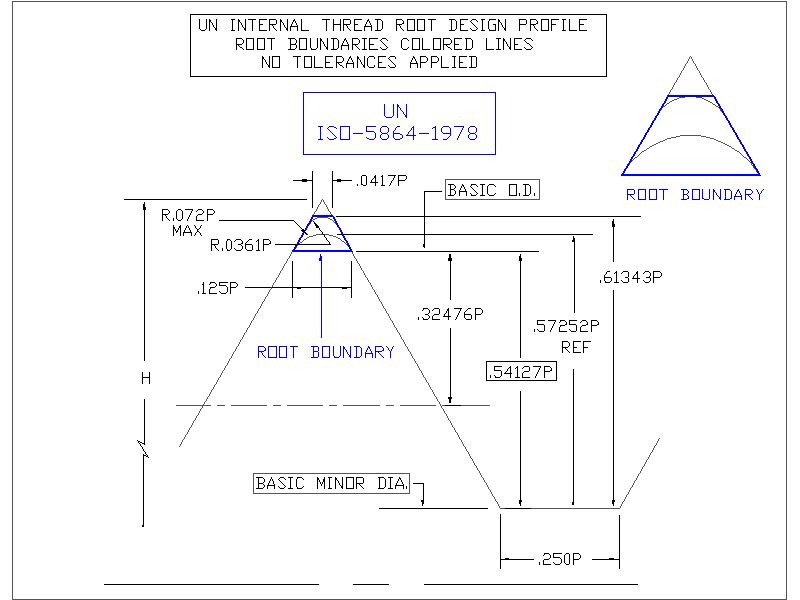
UN Internal Drwg.
UNR Definition
UNR Example
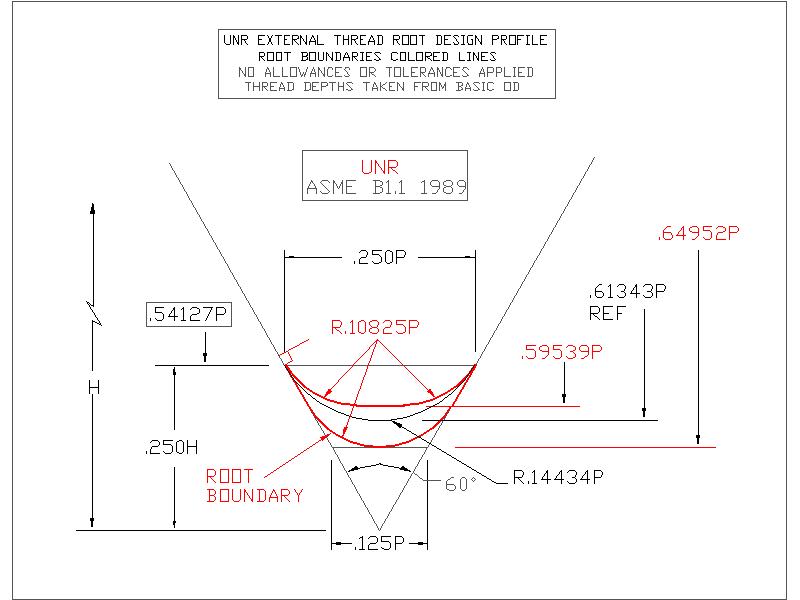
UNR External Drwg.
(UNR Basic & Internal Drwgs. are the same as UN)
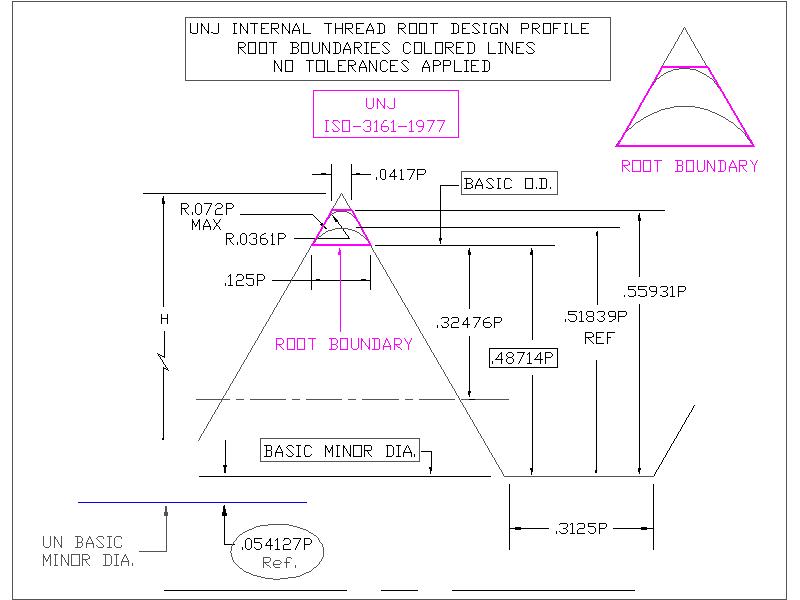
UNJ Definition
UNJ Example
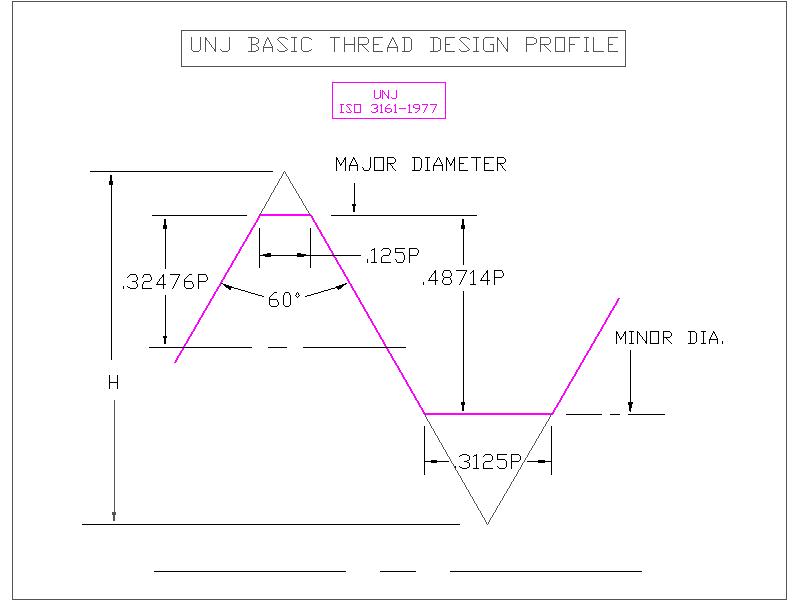
UNJ Basic Drwg.
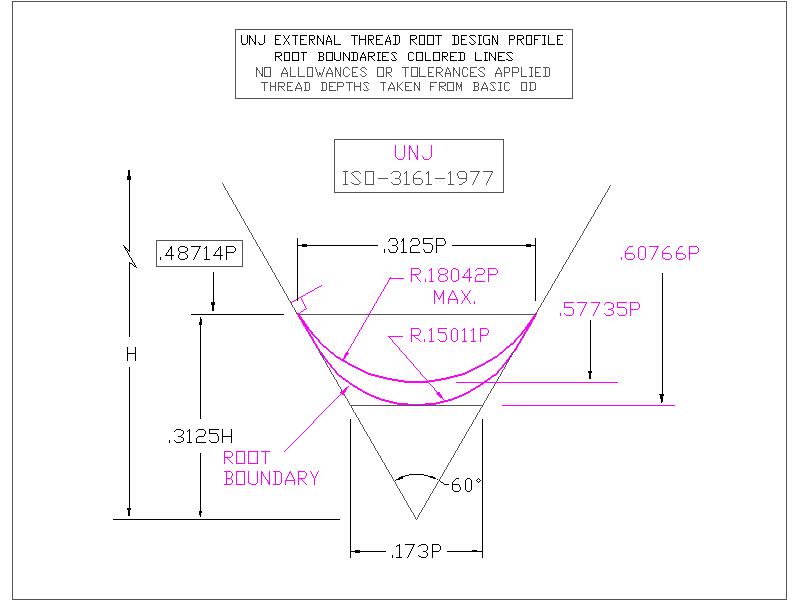
UNJ External Drwg.
UNJ Internal Drwg.
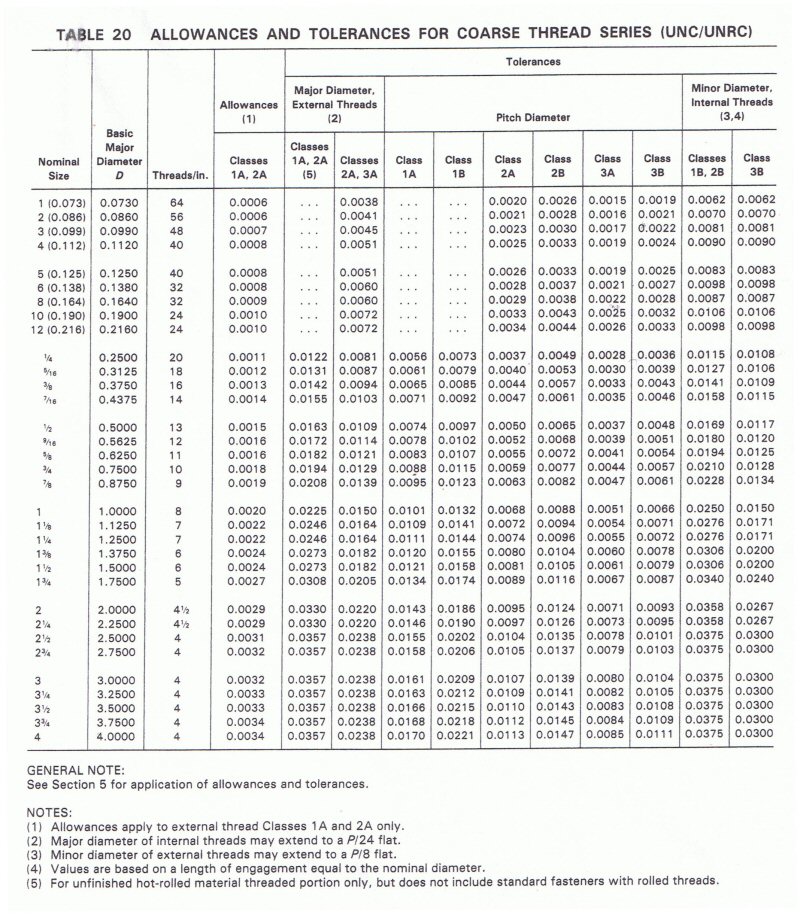
UN/R Tolerances Coarse
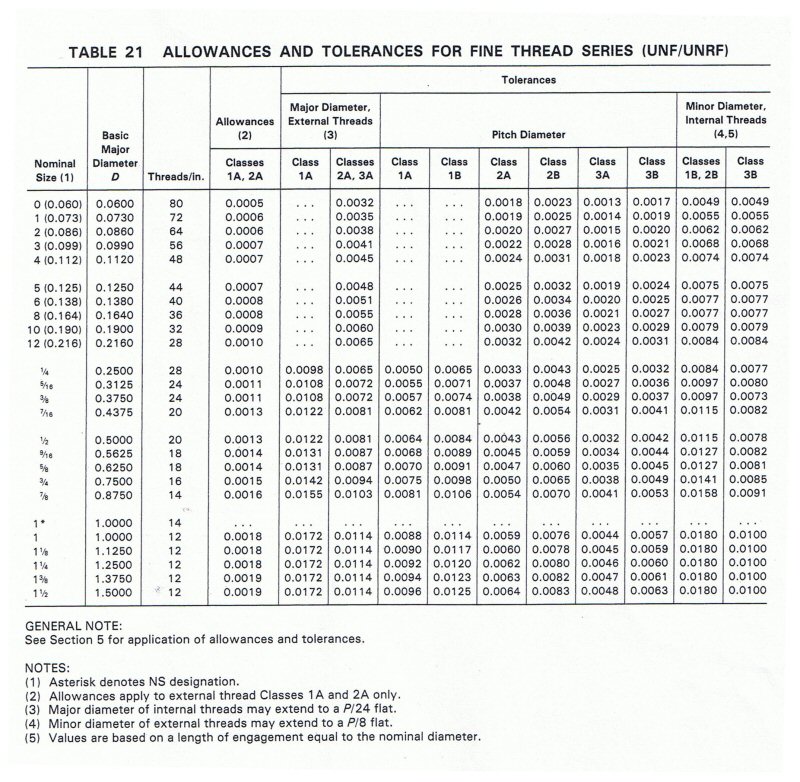
UN/R Tolerances Fine

UNJ TOLERANCES
Open in new Tab
INTRO. C Nairn
Colin Nairn
Oct. 2010
colinnairn@gmail.com
(Comments/Suggestions)
REFERENCES
  • ASME-B1.1 (1989)UN, UNR
  • ISO-3161 (1977) UNJ
  • ABBREVIATIONS
    AN= American National
    BWS= Best Wire Size
    ASME= American Society of Mechanical Engineers
    DIA= Diameter
    DOT= Depth of thread
    H= height
    ISO= International Standards Organization
    MAX= maximum
    MIN= minimum
    M/C H/B= Machinery’s Handbook
    MMC= Maximum material condition
    MOW= Measurement Over Wires
    OD= Outside Diameter
    P= Pitch = 1/TPI
    PD= Pitch Diameter
    R= Radius
    REF= Reference
    TDS=Tap Drill
    TNR= Tool Nose Radius
    TPI= Threads Per Inch= 1/P
    UN= Unified National
    UNC= Unified National Coarse
    UNF= Unified National Fine
    ~ Approximately equal to


    .

    INTRODUCTION
    HOME

    This paper was compiled to get a clearer understanding of UN, UNR &
    UNJ threads. The data was taken from ASME & ISO standards and
    transposed from the function “H”, the height of the thread triangle, to "P", a
    function of the pitch, so the machinist can control the 3 diameters, major
    minor & pitch.
    The other reason is to get a look at the root dimeter profile because when cutting a thread the root diameter is important in that it determines the strength of the thread. When cutting a thread, plunging the cutter deeper to get to size reduces the root diameter.

    Summary of Contents --

    • All the data required, with the exception of tolerances and allowances, is in "The Easy Memory Chart".
    • The flank of the thread must be perpendicular as indicated by the symbol in the drawings.
    • The minor diameter of an external thread is controlled by the depth of cut and the pitch diameter tolerance.
    • The only difference between a UN internal and a UNJ internal thread is that the minor diameter of a UNJ internal is increased by .054127P X 2.  (.054127 is 10% of .54127).

    The section "A Practical Method to cut a Thread" is included so that even a novice could cut an accurate thread.

    The section "General Notes" contains some miscellaneous observations.

    Using the "Easy Memory Chart" (see the drawings to clarify), I can accurately cut a UN class 3 external thread and know that is correct and will fit without having to use a gage or any tables. I would just stay away from MMC on all 3 diameters. For a class 1 or 2 external, however, I also need to know the allowance, which is available in Machinery's Handbook.


    The following “Easy Memory Chart” is a summary of all the data with the following
    two points in mind—

    1.) The “Best” D.O.T. was chosen so that no matter what T.N.R. is used
    (within limits) the thread profile will be correct.

    2.) The D.O.T. is given at MMC with no tolerances or allowances
    applied. Therefore, in a pinch you could cut the thread with the
    information given and “guesstimate” or look up, the tolerances
    and allowance for the amount to move the three diameters away from
    MMC.


    EASY MEMORY CHART (NO TABLES-MMC)
    BEST EXTERNAL THREAD DEPTHS (from basic O.D.)
      UN    .61343P (R 0 to .14434P)
      UNR .61343P (R .10825P to R .14434P)
      UNJ  .57735P (R .15011P to R .18042P)
      (Don't confuse .10825 with .18042)

    BEST INTERNAL THREAD DEPTHS (from UN basic minor dia.)
      UN/UNR/UNJ = .57252P (R 0 to .072P)
      then for a UNJ increase the minor diameter by (.054127P X 2).

    UN BASIC MINOR DIA. = basic O.D. - (2 X .54127P).
    BASIC P.D. = Basic O.D. - .64952P (UN,UNR,UNJ,External & Internal).
    Max. D.O.T. is D.O.T. selected plus 1/2 the allowance plus 1/2 the P.D. tolerance.

    MOW Formulas
    BWS = .57735P
    MOW = Nominal O.D. - (1.5155P) + 3W     (W = actual wire size used).
    MOW = Pitch Diameter - (.86603P) + 3W    (W = actual wire size used).


    No allowance
    or tolerances
    applied.
    R2C3
    General Notes
    HOME
    C3


    .

    A PRACTICAL METHOD TO CUT A UN THREAD

    1)   Using the "Easy Memory Chart" calculate the following--Pitch Diameter, Depth of Thread, Best Wire Size, Measurement Over Wires and the UN basic minor diameter (if you are cutting an internal thread).  Be sure to use the actual wire size used, not the best wire size, in the Measurement Over Wires formula..

    For example-    
    1-8-UNC-3A,  O.D.=1.00, PD (max.) = .9188, DOT = .0767, BWS = .072, MOW = 1.0266
    1-8-UNC-3B,  Basic minor dia. = .8647, DOT = .0716,

    2)   Machine the reference diameter, O.D. for external, I.D. for internal. Do not chamfer the leading edge, this will allow the cutter to take the initial shock on the flank as opposed to the tool tip.

    3)  (Important) Make sure that the threading tool has no rake, the profile is correct, it is on center and perpendicular to the work. (Use a sharp pointed cutter with a small radius honed on the point).

    4) Set the lathe levers or change gears for the desired pitch or T.P.I. Then take a light cut to check it is correct and set the crosslide dial to zero.

    5) To cut an internal thread first cut an external thread, to MMC, to use as a gage. Then machine the internal minor diameter (basic) as a reference for the depth of cut.

    6)   Set the compound parallel to the lathe axis, then feed the cutter in using the crosslide and the compound, whatever you feed in on the crosslide, feed ½ of that on the compound—for example, if you feed .012 radially (.024 dia.) on the crosslide, feed .006 on the compound. This means that most of the chip will be coming off the leading edge of the cutter preventing the chip from piling up in the middle, it is similar to feeding the cutter in at 29 1/2 degrees . When you reach the proper depth you can now move the compound back and forth to get the pitch diameter without changing the minor diameter.

    7) An easy way to use the three wire method to measure the pitch diameter--

    • Set the mike to .025" over the O.D.
    • Set the mike on top of the thread.
    • Insert two wires between the mike anvil and the bottom of the thread.
    • Take the other wire and insert it between the mike spindle and the top of the thread.
    • Take the measurement (make sure the 2 bottom wires are both tight) and observe the reading, back off the mike to get the wires out and remove the mike.
    • Reset the mike to the observed reading and lock it----you now have the M.O.W. recorded on your mike.

    GENERAL NOTES

    Flanks of all UN, UNR, UNJ external threads to be straight above the basic minor diameter (as shown by the perpendicular sign in the drawings), for internal threads it is below the basic major diameter. (Therefore, if cutting a UN external flat root at MMC the tool must be sharp, absolutely no radius).

    PD (basic) is the same for UN, UNR, UNJ, external, internal.

    Allowance is always applied to external.

    No allowance on a class 3 or UNJ or internal. Therefore a bolt/nut cut to MMC will be
    size/size.

    There is no UNR internal.

    A UNJ bolt will only mesh with a UNJ nut.

    UNJ is always class 3

    The min. root radius of a UNJ external is greater than the max. radius of a UN, UNR.

    A UNJ internal thread profile is the same as a UN except the basic minor dia. is increased
    by (.054127Px2).

    Threads are only rolled up to 1” diameter after which they are cut. (Rolled is stronger).

    A bolt is loaded in tension, a nut is loaded in compression.

    UNK- same as UNR except the minor diameter of the external thread is toleranced and
    inspection of the root radii is mandatory. Became obsolete in 1979 with the use of gaging
    system 22.

    Do not exceed 83% AN TDS, (100% UN).

    There is no class 1 for sizes below Ό ".

    P.D. tolerance internal is greater than the P.D. tolerance external. (By 30%, ASME B1.1- 1974).

    UN bolts- tensile strength 60,000 psi.
    UNJ bolts- tensile strength 160,000 psi.

    Length of engagement

    • UN/UNR = 1 diameter,
    • UNS = 9 pitches.
    • UNJC, UNJF, 8UNJ – 1 diameter.
    • UNJEF, 12UNJ, 16UNJ – 9 pitches.

    UN Definition HOME C4 DEFINITIONS


    DEFINITIONS


    UN EXTERNAL


    D.O.T. (From basic O.D.)

                Max. = .64952P + ½  allowance + ½ PD tolerance.

                Min. = .54127P (no radius) + ½  allowance.


                Best DOT = .61343P + ½  allowance + ½ PD tolerance used.


    ROOT RADIUS

                Optional but not to exceed .14434P (@ .61343P D.O.T.).


    O.D.

                Max. =  Nominal –  allowance.

                Min. =  Nominal –  allowance  –  tolerance.


                O.D. Tolerance

                            Class 1    = .09 x 3√P2

                            Class 2/3 = .06 x 3√P2


    P.D.

                Max. = nominal O.D.  –  .64952P – allowance.

                Min. = PD Max  tolerance.


    MINOR DIAMETER (Ref)

                Max. = nominal O.D. – (.54127P x 2) no radius –  allowance.

                Min. = nominal O.D. – (.64952P x 2) – allowance  – PD tolerance.


    UN INTERNAL


    MINOR DIA.                                                                      P.D.  Min.= Basic, all classes

                Min.(Basic) = Nominal O.D. –  (.54127P x 2)                    = O.D. –  .64952P

                Max. = tables                                                                  Max.= Basic + PD tol. for class specified

    D.O.T. (From basic minor diameter)

                Min. = .54127P (Sharp tool, no radius)

                Max. = .61343P + ½ the P.D. tolerance.

                Best  = .57252P + ½ PD tolerance (allows for a radius of 0 to .072P).


    ROOT RADIUS              0 - .072P


    UN Example HOME C5


    EXAMPLE


    .250 - 20 - UNC- 2A  (EXTERNAL)


    D.O.T.

                Max.= .0325 + .00055 + .00185 = .0349

                Min. = .0271 + .00055                  = .0276

                Best = .0307 + .00055 + .00185  = .033


    ROOT RADIUS

                Max. = .0072

                Min. = 0


    O.D.

                Max. = .250 – .0011                = .2489

                Min. = .250 – .0011 – .0081   = .2408


    P.D.

                Max. = .250 – .03248  – .0011 = .2164

                Min. = .2164 – .0037                 = .2127


    MINOR DIA.(Ref)

                Max. = .250 – .0541 – .0011                    = .1948

                Min. = .250  – .06495  – .0011  – .0037 = .1802


    .250 - 20 - UNC- 2B  (INTERNAL)


    MINOR DIA.                                                                         P.D.

                Min. = .250 – .05413                = .1959                 Min = .250 – .03248   = .2175

                Max. = tables                             = .207                   Max. = .2175 + .0049 = .2224


    D.O.T.

                Min. = .0271 (Sharp tool no radius)

                Max. =.0307 + .0024 = .033

                Best = .0286 + .0024 = .031


    ROOT RADIUS

                0 - .0036


    UN Basic Drwg. HOME C6
    UN External Drwg. HOME C7
    UN Internal Drwg. HOME C8
    UNR Definition HOME C9


    DEFINITION


    UNR EXTERNAL


    D.O.T (From basic O.D.)

                Max. = .64952P + ½ allowance + ½ P.D. tolerance.

                Min. = .59539P + ½ allowance.


                Best = .61343P  + ½ allowance + ½  P.D. Tolerance used.


    ROOT RADIUS (Mandatory)

                Max. = .14434P (@ .61343P)

                Min. = .10825P


    O.D.

                Max. = Nominal – allowance.

                Min. = Nominal – allowance – tolerance.


                O.D. Tolerance

                            Class 1    = .09 x 3√P2

                            Class 2/3 = .06 x 3√P2 

    P.D.

                Max.= nominal O.D. – .64952P – allowance.

                Min. = PD Max. – tolerance.


    MINOR DIAMETER (Ref)

                Max. = nominal O.D. – (.59539P x 2) – allowance.

                Min. = nominal O.D. – (.64952P x 2) – allowance – P.D. Tolerance.


    UNR INTERNAL (Same as UN Internal)


    MINOR DIA.                                                                      P.D.  Min.= Basic, all classes

                Min.(Basic) = Nominal O.D. –  (.54127P x 2)                    = O.D. –  .64952P

                Max. = tables                                                                  Max.= Basic + PD tol.  for class specified

    D.O.T. (From basic minor diameter)

                Min. = .54127P (Sharp tool, no radius)

                Max. = .61343P + ½  the P.D. tolerance.

                Best  = .57252P + ½  PD Tolerance (allows for a radius of 0 to .072P).


    ROOT RADIUS                    0 - .072P


    UNR Example HOME C10


    EXAMPLE


    .250 – 20 – UNRC– 2A  (EXTERNAL)


    D.O.T.

                Max.= .0325 + .00055 + .00185 = .0349

                Min. = .0298 + .00055                  = .030  

                Best = .0307 + .00055 + .00185  = .033


    ROOT RADIUS

                Max. = .0072

                Min. = .0054


    O.D.

                Max. = .250 – .0011                = .2489

                Min. = .250 – .0011 – .0081   = .2408


    P.D.

                Max. = .250 – .03248  – .0011 = .2164

                Min. = .2164 – .0037                 = .2127


    MINOR DIA.(Ref)

                Max. = .250 – .0595 – .0011                    = .1894

                Min. = .250  – .06495  – .0011  – .0037 = .1802


    .250 - 20 - UNRC- 2B (INTERNAL)


    MINOR DIA.                                                                         P.D.

                Min. = .250 – .05413                = .1959                   Min = .250 – .03248   = .2175

                Max. = tables                             = .207                    Max. = .2175 + .0049 = .2224


    D.O.T.

                Min. = .0271 (Sharp tool no radius)

                Max. =.0307 + .0024 = .033

                Best = .0286 + .0024 = .031


    ROOT RADIUS

                0 - .0036


    UNR External Drwg. HOME
    UNJ Definition HOME C12


    DEFINITIONS


    UNJ  EXTERNAL


    D.O.T. (From basic O.D.)

                Max. = .60766P @ R .15011P + ½  P.D. tolerance.

                Min. =  .57735P @ R .18042P max.


    Best  = .57735P @ R .15011P to R .18042P + ½  P.D. Tolerance used.


    ROOT RADIUS (Mandatory)

                Max. .18042P @ .57735 d.o.t.                        Do not confuse UNJ .18042 root radius

                Min. .15011P                                                                       with UNR .10825 root radius.


    O.D.

                Max. = Nominal

                Min. = Nominal –  tolerance.


                O.D. Tolerance = .06 x 3√P2


    P.D.

                Max. = Nominal O.D. – .64952P (same as UN ).

                Min. = PD Max. – tolerance.


    MINOR DIAMETER (Toleranced)

                Max. = Nominal O.D. – (.57735P x 2)  @ R .18042P.

                Min.  = Nominal O.D. – (.60766P x 2)  @ R .15011P –  P.D. tolerance.


    UNJ  INTERNAL


    MINOR DIA.                                                                              P.D.  Min.= Basic

                Min.(Basic) = Nominal O.D. –  (.48714P x 2)                           = O.D. –  .64952P

                Max. = tables                                                                         Max.= Basic + PD tol.


    D.O.T. (From UNJ basic minor diameter)

                Min. = .48714P (Sharp tool no radius).

                Max. = .55931P + ½  the P.D. tolerance.

                Best  = .51839P + ½ PD tolerance (allows for a radius of 0 to .072P).


    ROOT RADIUS                    0 - .072P


    UNJ Example HOME C13


    EXAMPLE


    .250 – 20 – UNJC – 3A   (EXTERNAL)


    D.O.T.

                Max. = .0304 + .0014 = .0318

                Min. =                           = .0289

                Best = .0289 + .0014  = .0303


    ROOT RADIUS

                Max. = .009

                Min. = .0075


    O.D.

                Max. =                       = .250

                Min. = .250 – .0081 = .2419


    P.D.

                Max. = .250 – .0325   = .2175

                Min. = .2175 – .0028  = .2147


    MINOR DIA. (TOLERANCED)

                Max. = .250 – .0578               = .1923

                Min. = .250 – .0608 – .0028 = .1864


    .250 – 20 – UNJC – 3B (INTERNAL)


    MINOR DIA.                                                                         P.D.

                Min. = .250 – .0487    = .2013                                            Min = .250 – .03248   = .2175

                Max. = tables               = .2121                                            Max. = .2175 + .0036 = .2211


    D.O.T.

                Min. =                         =.0244 (Sharp tool no radius).

                Max. = .028 + .0018   = .0298

                Best =  .0259 + .0018 = .0277                                (Or cut a UN internal then increase

                                                                                                      the minor dia. By .0054)


    ROOT RADIUS                    0 - .0036


    UNJ Basic Drwg. HOME C14
    UNJ External Drwg. HOME C15
    UNJ Internal Drwg. HOME C16
    UN/UNR
    Tolerances
    Coarse
    HOME
    UN/UNR
    Tolerances
    Fine
    HOME